Mastering Makeup Application Tips: Contour, Bronzer, and More
Discover essential makeup application tips, including contour vs bronzer, ombre lip tutorial, and more, for a flawless, long-lasting, balanced look.
8 min read
Key Takeaways
- Prep and prime properly to extend wear and create a smooth canvas.
- Layer foundation, concealer, and powder strategically for seamless coverage.
- Use contour and bronzer for sculpting and warmth—each has its distinct placement and purpose.
- Master the ombre lip tutorial for dimensional, full-looking lips.
- Create a natural eyeshadow look with muted tones and precise blending.
- Employ longevity tips—press powder, set with spray, and troubleshoot fallout.
Table of Contents
- Overview of Makeup Application
- Technique-Focused Tips
- Balancing Your Makeup Look
- Specific Techniques Explored
- Integrating the Techniques
- Conclusion
Section 1: Overview of Makeup Application (Keywords: makeup application tips, makeup longevity tips)
Fundamentals of Prep and Layering
- Hydrate first: Apply a lightweight moisturizer to reinforce your skin’s barrier and smooth dry patches.
- Prime second: Use a pore-blurring or grip primer to anchor foundation and extend wear.
Layering Strategy
- Liquid foundation: Dab with a damp Beauty Blender from the face center outward. Avoid streaks and build coverage without heaviness (see how-to apply foundation evenly).
- Concealer placement: Target blemishes and high points—under eyes, forehead center, nose bridge, chin arch—and blend with a small brush or fingertip.
- Translucent powder: Immediately set concealer and T-zone to lock products in place and absorb excess oil (setting powder vs spray).
Tool Roles and Finishes
- Beauty sponges: Create an airbrushed, dewy finish. Best for liquid and cream formulas.
- Foundation brushes: Offer fuller coverage and precision. Use synthetic bristles for liquids, natural bristles for powders.
- Fan brushes: Lightly dust highlighter or sweep away eyeshadow fallout without disturbing the base.
Real-world tip: Prime oily zones with a mattifying formula and hydrate dry patches with a moisturizing primer to balance skin type and boost longevity.
For more guidance, explore how to apply makeup and everyday makeup routine tips.
Section 2: Technique-Focused Tips
Subsection 2A: General Makeup Application Tips (Keyword: makeup application tips)
- Buff foundation in small circular motions to integrate product into pores for a seamless, skin-like finish.
- Apply concealer with a small synthetic brush or fingertip. Use leftover concealer on eyelids as a primer to neutralize tone.
- Pat translucent setting powder under eyes and across your T-zone with a fluffy brush to lock products without flattening natural glow.
- For eyeshadow base: Sweep a light neutral shade from lash line to brow bone, then define the crease with a mid-tone using a windshield-wiper motion.
Experience tip: Pre-warm cream products with fingertips—heat helps formulas blend better and look more natural on camera.
Discover more at everyday makeup routine tips and how to apply makeup.
Subsection 2B: Makeup Longevity Tips (Keyword: makeup longevity tips)
- Prime appropriately: Choose a mattifying primer for oily skin or a hydrating primer for dry skin to balance texture and enhance hold.
- Press, don’t sweep: Use a damp sponge or flat brush to press powder into skin for better adhesion.
- Setting spray finish: Mist a fine-particle setting spray in an X and T formation to seal layers and reduce powdery residue.
- Fallout troubleshooting:
- Trap eyeshadow fallout by layering a sticky primer under the eye.
- Remove stray pigment with a clean fan brush or a Q-tip dipped in micellar water.
Expert insight: Pressing setting powder under the eyes can cut midday creasing by up to 80%.
Learn more at how to apply makeup and everyday makeup routine tips.
Section 3: Balancing Your Makeup Look (Keyword: balance a makeup look)
“Balance a makeup look” means no single feature fights for attention; base, cheeks, eyes, and lips work together in harmony.
Cheek Trio
- Bronzer: Apply in a soft “3” shape—along the hairline, under cheek hollows, and along the jawline for natural warmth.
- Blush: Sweep on the apples of cheeks, blending toward the temples for a healthy flush.
- Highlighter: Pat a subtle sheen atop cheekbones, above the blush line, to reflect light softly.

Balance Rule
- Pair bold eyes with muted lips or vice versa.
- Adjust intensity by face shape: round faces benefit from deeper bronzer shades; long faces can use blush higher on apples.
- Consider lighting: softer light calls for lighter blush and highlight; bright sunlight can handle punchier color.
Makeup artist Natalie Setareh recommends this approach to avoid over-contouring and maintain a natural look.
Further reading: how to apply makeup, everyday makeup routine tips, and makeup for beginners 4-step application.
Section 4: Specific Techniques Explored
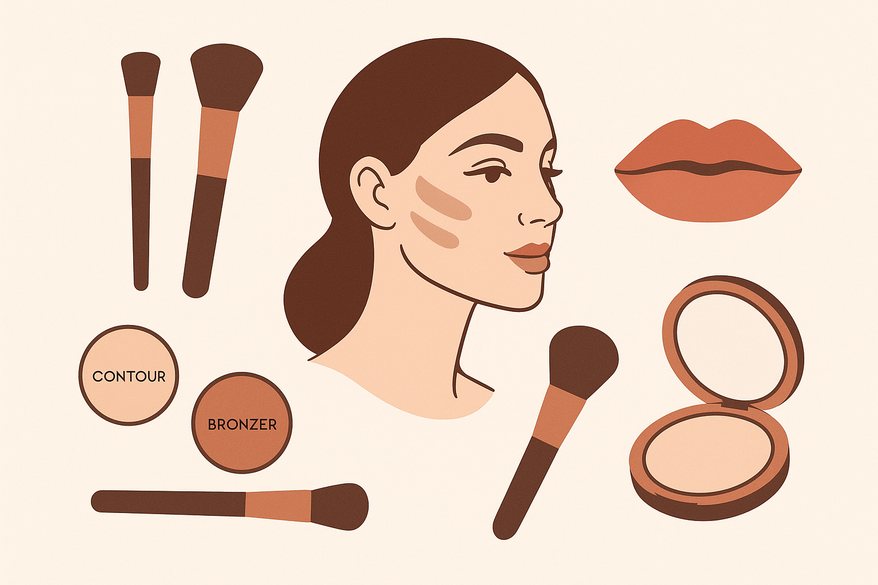
Subsection 4A: Contour vs Bronzer (Keyword: contour vs bronzer)
Contour vs bronzer can confuse even pros. Here’s how to sculpt and sun-kiss correctly:
Define Contour
• Product: Matte, cool-toned powder or cream two to three shades deeper than skin.
• Placement: Under cheekbones, along jawline, temples, and sides of nose.
• Purpose: Creates shadows to slim and sculpt features.
Define Bronzer
• Product: Warm, golden-peach or light brown powder or cream.
• Placement: Where sunlight naturally hits—cheekbones, forehead edge, bridge of nose, chin.
• Purpose: Adds warmth and radiance, mimicking a sun-kissed glow.
Step-by-Step
1. After setting powder, tap bronzer on the cheeks with a fluffy brush, blending upward.
2. Use a dense, angled brush for contour: draw a light line under cheek hollows, then blend upward in short strokes.
3. Blend edges with a clean fluffy brush to diffuse harsh lines.
Real-life note: An angled synthetic brush for contour works best in humid climates—it repels sweat and prevents slipping.
Explore more: how to apply makeup, makeup for beginners 4-step application, and face contouring tutorial AI guide.
Subsection 4B: Ombre Lip Tutorial (Keyword: ombre lip tutorial)
The ombre lip technique creates a gradient for fullness and dimension.
Ombre Lip Defined
• Gradient effect: Darker outer edges fading to a lighter, glossy center.
Step-by-Step
1. Outline lips with a deep matte liner; fill in the outer one-third.
2. Apply a mid-tone lipstick or satin gloss to the center.
3. Blend liner into mid-tone with a small lip brush or fingertip, pressing lips together.
4. Tap a light nude or peachy gloss at the very center for extra pop.
5. Blot lightly with a tissue, then dust translucent powder around edges to prevent feathering.
Tip for longevity: Use long-wear formulas and avoid oils near the lip line to minimize feathering.
Learn more at how to apply makeup.
Subsection 4C: Natural Eyeshadow Look (Keyword: natural eyeshadow look)
A natural eyeshadow look lifts and defines without drama.
Natural Eyes Defined
• Soft, muted tones that complement your eye color and shape.
Step-by-Step
1. Base shade: Sweep a neutral ivory or soft beige from lash line to brow bone.
2. Mid-tone crease: Use a matte light-brown shade in a windshield-wiper motion.
3. Highlight: Pat a champagne shimmer on the inner corner and brow bone.
4. Liner & Mascara: Tight-line upper lashes with a brown pencil; apply one to two coats of brown mascara.
Personal observation: Angling your brush tip toward the nose when highlighting the inner corner brightens eyes in photos.
More tips at everyday makeup routine tips.
Section 5: Integrating the Techniques (Keywords: makeup application tips, balance a makeup look)
Full Routine Example
- Moisturize and prime to prep and secure products.
- Buff liquid foundation, then apply concealer and set with translucent powder.
- Apply bronzer for warmth, contour for structure, blush for flush, and highlight for luminosity.
- Create a natural eyeshadow look, tight-line lashes, and add mascara for definition.
- Finish with the ombre lip tutorial: line, mid-tone center, blend, and gloss if desired.
- Mist with setting spray for all-day wear and to meld powder layers.
Each step supports both technique mastery and a balanced makeup look. Thoughtful layering and complementary shades deliver a cohesive, polished result every time.
Makeup Check AI offers AI-powered look generation, video-analysis tutorials, and personalized beauty plans—perfect for refining your routine with smart technology.
Conclusion (Keyword: makeup application tips)
We’ve covered essential makeup application tips: prep and prime for longevity, blend for seamless coverage, balance bronzer and contour, master an ombre lip tutorial, and achieve a natural eyeshadow look. Experiment with these methods and refine your technique to find what suits your style and skin.
Makeup Check AI can guide you further with AI-powered tutorials, personalized beauty plans, and instant feedback. Try these makeup application tips today and share your favorite techniques or questions below to join our beauty community!
FAQ
What’s the difference between contour and bronzer?
Contour uses a cool-toned product two to three shades deeper than your skin to create shadows and sculpt. Bronzer uses a warm, golden-peach shade to add natural-looking warmth where the sun hits.
How do I create an ombre lip?
Outline and fill the outer one-third of your lips with a dark liner, apply a mid-tone to the center, blend inward, then add a light gloss at the very center for dimension.
What’s the best way to prevent makeup from creasing all day?
Prime appropriately for your skin type, set concealer and foundation with translucent powder by pressing it in, then finish with a fine-mist setting spray.
How can I achieve a natural eyeshadow look?
Sweep a neutral base from lash to brow, define the crease with a matte mid-tone in windshield-wiper motions, highlight inner corners, then tight-line and apply brown mascara.
Which primer should I choose?
Use a mattifying primer if you have oily skin and a hydrating primer if your skin is dry. This balances texture and enhances product adherence.