Mastering How to Apply Foundation Evenly: Techniques, Tools & Pro Tips
Learn how to apply foundation evenly using stippling vs buffing, blending with a sponge, and achieve buildable coverage techniques for a flawless finish.
Estimated reading time: 7 minutes
Key Takeaways
- Use sponges, brushes, fingers, or airbrush kits to achieve seamless foundation coverage.
- Master stippling vs buffing and buildable coverage for a natural, long-lasting base.
- Follow step-by-step guides to prep skin, blend products, and refine techniques.
- Apply expert tips on product amount, lighting, and tool hygiene to prevent patchiness and cakiness.
Table of Contents
- Introduction
- Understanding the Basics of Foundation Application
- Exploring the Tools for Foundation Application
- Comparing Application Techniques – Stippling vs Buffing
- Step-by-Step Guides for Each Method
- Practical Tips and Expert Advice
- Makeup Check AI Integration
- Conclusion
- FAQ
Introduction
Learning how to apply foundation evenly is the cornerstone of a flawless complexion. A smooth, uniform base sets the stage for any makeup look and boosts confidence. Yet common challenges—streaks, patchiness, cakey finish—derail even experienced users. For the best long-term results, don’t forget to nail your pre-makeup skincare routine by checking out our Ultimate Pre-Makeup Skincare Routine.
In this guide, we’ll tackle:
- Stippling vs buffing applications
- Buildable coverage techniques for sheer to full finish
- Airbrush foundation basics for pro-level results
- How to blend foundation with sponge for dewy, seamless skin
By mastering these methods and tools, you’ll achieve balanced, natural-looking coverage—every time.
Understanding the Basics of Foundation Application
Even application means smooth, uniform coverage with no sharp lines, blotches, or heavy patches. This natural-looking base enhances skin without obvious makeup.
Why Even Application Matters
- Creates an undetectable canvas for blush, contour, and highlight
- Balances skin tone and covers imperfections without masking texture
- Improves makeup longevity by adhering foundation evenly
Buildable Coverage Techniques Defined
Layering thin coats allows you to go from sheer to full coverage without heaviness. With each light application, you target redness or blemishes only where needed—maintaining a natural finish. If you ever struggle with a cakey finish, our Ultimate Cakey Foundation Fix will help you avoid mistakes and blend for flawless coverage.
Exploring the Tools for Foundation Application
Blend Foundation with Sponge
- Sponge type: hydrophilic wedges or teardrops (e.g., Beauty Blender)
- Prep: dampen until sponge expands and is just moist—no dripping
- Application: bounce (stippling) motion to press foundation in for a fresh, dewy finish
- Edge work: use tapered point for nose sides, inner eye corners, and lower lash line
Brushes for Polished Coverage
- Flat foundation brushes: for medium coverage, glide product across skin
- Buffing brushes: dense, rounded bristles that swirl foundation in small circles for full coverage without streaks
- Technique: apply product, then work in circular buffing motions to diffuse edges
Fingers for Quick Melt-In
- Warm fingertips gently melt liquid formulas into skin—ideal for tinted moisturizers or BB creams
- Caution: heavier foundations may appear patchy if not sealed with a sponge or brush
Airbrush Foundation Basics
- Airbrush system: mini compressor sprays a fine mist of water-based foundation
- Hold 6–8 inches from face; use continuous circular sweeps to avoid heavy spots
- Coverage: build by layering ultra-thin coats; finish is long-wearing and photo-ready
Comparing Application Techniques – Stippling vs Buffing
Choosing stippling vs buffing depends on desired finish, skin type, and coverage needs.
Stippling (pointillating technique)
- Tool: dual-fiber stippling brush
- Motion: dotting/patting to deposit foundation
- Result: light, airbrushed effect; ideal for sheer-to-medium coverage, textured or mature skin
- Benefit: minimizes product over-application, retains skin’s natural texture
Buffing (polishing technique)
- Tool: dense, rounded buffing brush
- Motion: small circular strokes to blend
- Result: smooth, full coverage; perfect for concealing imperfections
- Benefit: controls oily zones, ensures even pigment distribution
Step-by-Step Guides for Each Method
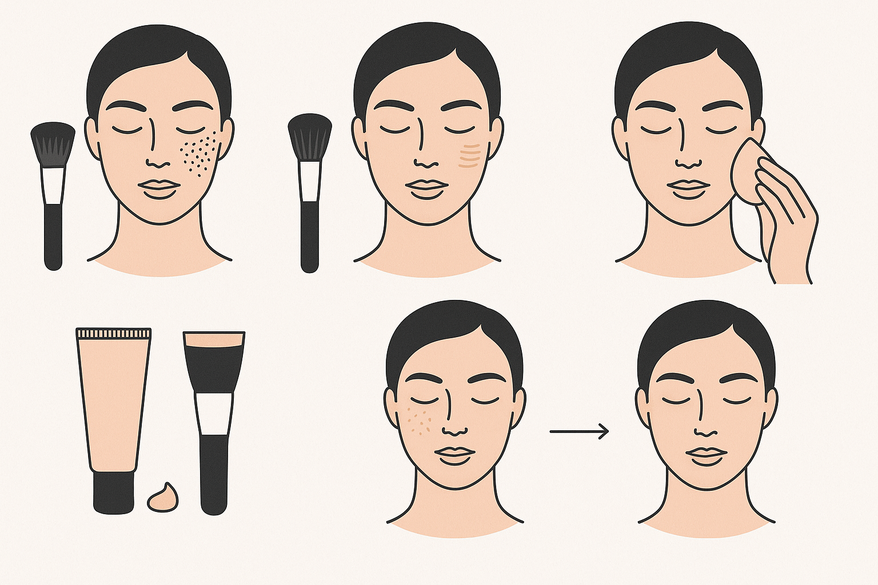
How to Apply Foundation Evenly
- Prep skin: cleanse, moisturize, and prime to smooth texture and prolong wear.
- Dispense a pea-sized amount at the center of your face.
- Using your tool (sponge, brush, or fingers), blend outward in thin layers: cheeks → forehead → nose → chin.
- Seam the jawline and hairline to erase any visible edges.
- Build additional coverage in one or two more thin layers on problem areas.
Buildable Coverage Techniques
- Apply a light, sheer layer over entire face; let it set 30 seconds.
- Identify areas needing more coverage (redness, dark spots).
- Add a second thin coat only on targeted spots.
- Blend the junctions between layers for a unified finish.
How to Blend Foundation with a Sponge Effectively
- Wet sponge until doubled in size and just damp.
- Tap—not drag—the sponge over skin in a bouncing motion to embed product.
- Use the broad side for larger planes (cheeks, forehead); the point tip for contours (nose, under eyes).
- Rinse and wring sponge between uses to prevent buildup and bacteria.
Airbrush Foundation Basics
- Select airbrush-specific foundation formula—water-based for the finest mist.
- Fill reservoir; test-spray on back of hand to gauge pressure.
- Hold the nozzle 6–8 inches from face; keep moving in soft circular sweeps.
- Layer light coats, waiting for each to dry before adding more.
- Optional: set with a sheer dusting of translucent powder to lock in place.
Practical Tips and Expert Advice
- Start with minimal product; you can always build—avoid a cakey finish by under-applying initially.
- Fix brush streaks by patting edges with a damp sponge—this blends harsh lines instantly.
- Work in good lighting—natural daylight plus soft indoor light helps catch any missed bits.
- For oily skin: lightly set T-zone with translucent powder. For dry skin: skip excess powder to keep dewiness intact.
- Prevent foundation settling into fine lines: mist a setting spray or gently press areas with a damp sponge.
- Sanitize tools regularly; dirty sponges and brushes harbor bacteria that can lead to breakouts.
Makeup Check AI Integration
For a tech-driven approach, try using AI-powered feedback. Tools like Makeup Check AI analyze your foundation application and offer tailored suggestions to refine your technique.
Conclusion
Mastering how to apply foundation evenly transforms your makeup base into a professional-looking canvas. By understanding stippling vs buffing, utilizing sponges, brushes, and airbrush tools, and applying buildable coverage techniques, you control texture, coverage, and finish.
Experiment with each method to discover which best suits your skin type and desired look. Share your experiences, results, and questions below—let’s build a community of beauty enthusiasts helping each other perfect the art of flawless foundation.
FAQ
- How do I choose between a sponge and brush? Consider your coverage needs: sponges offer a dewy finish, brushes give more control and fuller coverage.
- What causes cakey foundation and how do I fix it? Over-applying product or neglecting proper skin prep. Start with thin layers, prime well, and blend edges with a damp sponge.
- Can I use fingers for all foundation formulas? Best for lightweight, hydrating formulas. For heavier foundations, seal in with a sponge or brush to avoid patchiness.
- Is airbrush foundation suitable for sensitive skin? Choose a high-quality, water-based formula and sanitize your airbrush equipment regularly to prevent irritation.