How to Contour by Face Shape: Step-by-Step Guide for Flawless Makeup
Discover how to contour by face shape with our easy guide. Learn contour, blush, and brow tips for every face shape using Makeup Check AI's personalized tools.

Estimated reading time: 11 min
Key Takeaways
- Learn how to determine your face shape before contouring.
- Find the best contour, blush, and brow placement for every face shape.
- Understand highlight and contour pairing for flawless definition.
- Choose the right products and blending techniques for a natural look.
- Use AI-powered tools like Makeup Check AI for personalized, pro-level results.
Mastering how to contour by face shape is the secret to creating harmonious, sculpted makeup looks that flatter your unique features. Whether you have a round, oval, square, heart-shaped, oblong, or diamond face, the right contour technique can make all the difference. This comprehensive guide walks you through how to determine your face shape, adapt your contour, blush, and brow makeup, and blend like a pro using both classic tips and the power of AI beauty apps like Makeup Check AI.
Step 1: How to Determine Your Face Shape
Before you reach for your contour palette, you need to know your face shape. This step is crucial because your contour and highlight placement will be tailored to your bone structure. Here’s how to figure it out:
- Mirror Outline Method: Pull your hair back, stand in front of a mirror, and use an eyeliner pencil to trace the outline of your face. Step back and look at the overall shape.
- Measurement Method: Measure your forehead, cheekbones, jawline, and face length with a flexible tape. Compare these ratios:
- Round: Width and length are similar, soft jawline.
- Oval: Length is about 1.5x the width, gently rounded chin.
- Square: Forehead, cheekbones, and jawline are similar width; strong, angular jaw.
- Heart: Forehead wider than jawline, pointed chin.
- Oblong/Long: Face length noticeably longer than width, straight sides.
- Diamond: Cheekbones are widest, narrow forehead and chin.
If you’re unsure, use the AI face shape analysis in Makeup Check AI for instant, personalized feedback and recommendations.
Step 2: Choosing Your Contour Products & Tools
Different face shapes can benefit from different contour textures and tools. Here’s what to consider:
- Powder Contour: Great for oily skin or soft, natural definition. Use with a fluffy angled brush.
- Cream Contour: Best for dry or mature skin. Blends seamlessly for a skin-like finish. Apply with a damp sponge or synthetic brush.
- Contour Sticks: Convenient for beginners and touch-ups. Draw directly onto the skin and blend.
Always choose a contour shade 1-2 shades darker than your skin tone and a highlight that’s 1-2 shades lighter. For a flawless base, apply contour after foundation and concealer for smoother blending.
Step 3: Contour Placement for Each Face Shape
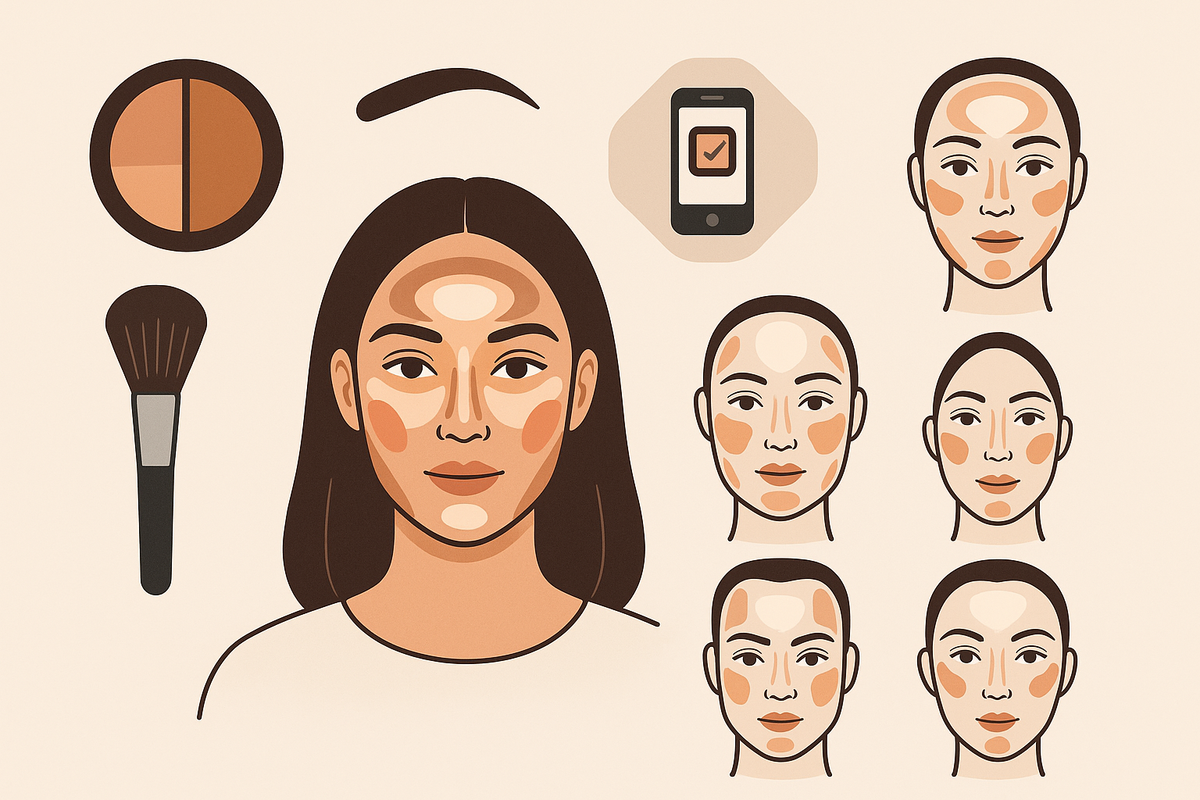
Now, let’s break down how to contour by face shape for each type. Follow these placement tips for seamless results:
- Round Face: Focus on creating the illusion of length and more angular features.
- Contour: Sides of the forehead, under cheekbones towards the mouth (avoid going too close), and jawline from ears to chin.
- Highlight: Center of forehead, under eyes in a triangle, and chin.
- Blush: Slightly higher on the cheeks, swept upward.
- Brow Shape: Slight arch to elongate the face.
- Oval Face: Enhance natural symmetry; less contour needed.
- Contour: Lightly under cheekbones and temples if desired.
- Highlight: Center of forehead, under eyes, chin.
- Blush: On the apples of the cheeks, blended slightly upward.
- Brow Shape: Soft, natural arch suits best.
- Square Face: Soften strong jaw and forehead angles.
- Contour: Along jawline (blend well), temples, and sides of forehead.
- Highlight: Center of forehead, under eyes, chin.
- Blush: Swept in circular motions on the cheeks.
- Brow Shape: Rounded or soft-arched brows to balance angles.
- Oblong/Long Face: Visually shorten the face.
- Contour: Along hairline at top of forehead, under chin, under cheekbones (not too low).
- Highlight: Center of face—avoid highlighting chin/forehead too much.
- Blush: Horizontal sweep to add width.
- Brow Shape: Flat or less arched to reduce the appearance of length.
- Heart-Shaped Face: Minimize forehead width, soften chin.
- Contour: Sides of forehead/temples, small dab on the chin's point.
- Highlight: Under eyes, center of forehead, chin (sparingly).
- Blush: On outer apples, swept upwards.
- Brow Shape: Soft arch, rounded tail.
- Diamond Face: Soften cheekbones, balance narrow chin/forehead.
- Contour: Cheekbones (blend down), sides of forehead, under chin.
- Highlight: Center of forehead, under eyes, chin.
- Blush: On the tops of cheekbones, blended outwards.
- Brow Shape: Curved or soft angle for balance.
For more in-depth shape-by-shape techniques, see our advanced guides like AI Makeup Tutorial: Your Guide to Smart Beauty Routines.
Step 4: Where to Contour—Cheekbones, Temples, Jawline, Hairline, and Chin
Understanding the basics of contour placement will help you adapt any look to your face shape. Here’s a quick map of key zones:
- Cheekbones: Start at the top of your ear and angle towards the corner of your mouth, stopping midway. Blend upward.
- Temples & Hairline: Blend contour into the temples for width, or along the hairline to shorten the face as needed.
- Jawline: Apply along the edge of the jaw and blend down the neck for natural shadow.
- Chin: Dot and blend contour under the chin to soften or recede it as needed.
Always blend thoroughly to avoid harsh lines. Tailor your placement to your unique features and desired effect.
Step 5: How to Pair Contour with Highlight for Each Face Shape
Highlighting is just as important as contouring to bring forward your best features. Here’s how to pair them:
- Highlight: Use a concealer or cream/luminous powder 1-2 shades lighter than your skin. Apply on the high points—tops of cheekbones, bridge of nose, center of forehead, under eyes, and chin (unless you want to downplay length or chin size).
- Balance: Always set cream/liquid products with a light dusting of translucent or matching powder for long wear.
- Blush Placement: Adjust where you apply blush based on your face shape for the most flattering result.
You can easily preview highlight and contour combinations using the virtual try-on and tutorials in Makeup Check AI.
Step 6: The Art of Blending & Finishing Touches
No matter how perfect your placement, blending is what makes your contour look seamless:
- Use circular or stippling motions with a brush or damp makeup sponge.
- Start with less product, building up gradually.
- Check your look in natural light to ensure no harsh lines.
Finish with a setting spray or translucent powder to lock in your makeup. For extra polish, define your brows in a shape that complements your face. Explore more on brow shaping and virtual try-ons in our post on AI Makeup App: The Ultimate Guide to Smarter Beauty Routines.
Tips & Common Mistakes
- Don’t skip face shape analysis: Guessing often leads to less flattering results. Use AI tools or the mirror method for accuracy.
- Don’t apply too much product: Start light and build—over-contouring is hard to fix.
- Blend, blend, blend: Harsh lines are the number one giveaway of contour makeup.
- Match your undertone: Pick contour shades that match your skin’s undertone for the most natural look.
- Set your makeup: Especially important for cream products, to avoid smudging.
If you want to experiment risk-free, try the AR beauty try-on in AR Beauty Try On: The Future of Virtual Makeup and Skincare.
Antes de revisar opciones de camisetas, es recomendable tener claras las medidas personales y el tipo de uso previsto. Al evaluar distintas posibilidades, camiseta para aficionados del Liverpool permite centrar la revisión en información práctica de la prenda. Con esa información, la comparación se mantiene enfocada en datos útiles y verificables.
Conclusion
Learning how to contour by face shape is a game-changer for your makeup routine. With the right analysis, placement, and blending, you can enhance your natural beauty and create endless looks tailored just for you. AI-powered apps like Makeup Check AI make it easy to discover your face shape, customize your contour, and learn from step-by-step tutorials—so you always feel confident in your technique. Ready to level up? Explore over 300 looks and get personalized feedback with Makeup Check AI.
FAQ
- How do I figure out my face shape before contouring?
Use the mirror outline method or take facial measurements to compare your proportions. For instant accuracy, try an AI face shape scan with Makeup Check AI. - Where should I contour a round face?
Contour the sides of the forehead, under the cheekbones (angled toward the mouth but not too low), and along the jawline to create a more sculpted, elongated look. - How do you contour a square face to soften angles?
Apply contour along the jawline, temples, and sides of the forehead to minimize width and soften strong angles. Blend well for a natural finish. - What is the best contour placement for a long or oblong face?
Contour along the hairline at the top of the forehead and under the chin to visually shorten the face. Avoid dragging contour too low on the cheekbones. - Should you highlight different areas depending on your face shape?
Yes, adjust your highlight placement to balance your features—highlight areas you want to bring forward and avoid those you’d like to minimize. - Do you contour before or after foundation and concealer?
For most, contour after foundation and concealer for easier blending and a seamless finish. Cream products work best over liquid foundation.