Highlighting Techniques for Face Shape: The Complete Makeup Guide
Master highlighting techniques for face shape. Discover step-by-step makeup, contour, blush, and brow tips for every face shape with expert guidance.

Estimated reading time: 15 min
Key Takeaways
- Personalized highlighting techniques for every face shape maximize your natural features.
- Understanding your face shape is the foundation for effective makeup, contour, blush, and brow placement.
- Strategic use of light and shadow can visually balance, elongate, or soften facial proportions.
- Blending and product choice prevent harsh lines and avoid emphasizing skin texture.
- AI beauty apps like Makeup Check AI provide tailored recommendations and virtual try-ons.
Table of Contents
- Section 1: How to Determine Your Face Shape
- Section 2: Highlighting and Contouring—The Science of Light & Shadow
- Section 3: Highlight Placement Zones and Product Selection
- Section 4: Highlighting Techniques for Every Face Shape
- Section 5: Blending, Finishes, and Avoiding Common Mistakes
- Section 6: Blush & Brow Placement by Face Shape
- Conclusion
- FAQ
Section 1: How to Determine Your Face Shape
Why Face Shape Matters in Makeup
Knowing your face shape is the first and most critical step to mastering highlighting techniques for face shape. Face geometry influences how light naturally falls and where shadows add depth. This knowledge customizes your approach for makeup, contour, blush, and brow shaping.
Applying makeup without a clear understanding of your face shape often leads to results that don’t enhance your best features or, worse, emphasize areas you’d like to minimize. For example, highlighting the widest part of a round face can make it appear even rounder, while strategic placement can visually elongate and slim. This is why face shape analysis remains a foundational skill for makeup artists and enthusiasts alike. Precise placement of highlight and contour can address asymmetry, draw attention to your favorite features, and help you achieve your desired look—whether that’s a natural glow or a sculpted finish.
Step-by-Step: Measuring and Mapping Your Face
- Forehead width: Measure across the widest part, typically halfway between your eyebrows and hairline. Use a flexible measuring tape or even a piece of string, then compare to a ruler.
- Cheekbone width: Measure from one cheekbone to the other, just below the outer corners of your eyes. This is usually the face’s widest point on most people.
- Jawline width: Measure at the widest part—just below your ears across to your chin. Take note whether your jaw is angular or rounded, as this plays into your face shape.
- Face length: From the center of your hairline to the tip of your chin. You can also measure from the top of your forehead (where hair starts) straight down to the bottom of your chin.
Compare these proportions. For example, if your face is roughly as wide as it is long with rounded edges, you likely have a round face; if your chin is pointed and your forehead is wider, you may have a heart-shaped face. If your face is noticeably longer than wide with straight sides, you might fall into the oblong/long category. The key is to look for the dominant features: is your jawline strong or soft? Are your cheeks the widest point? Is your forehead particularly broad or narrow?
It can help to tie your hair back, stand in front of a mirror, and trace the outline of your face with a washable marker or lipstick. This visual aid often makes the differences in width and angles much clearer.
Face Shape Categories & Quick Identifiers
- Round: Almost as wide as it is long, soft curves, full cheeks. Jawline and forehead are rounded, and the widest part is often the cheeks. Think Selena Gomez or Chrissy Teigen.
- Oval: Forehead slightly wider than chin, balanced proportions, gently rounded jaw. The face tapers slightly from the forehead to the chin. Examples include Beyoncé and Jessica Alba.
- Square: Strong, angular jawline, forehead, and jaw roughly the same width. Width of cheeks, forehead, and jaw are similar, with a flat chin. Think Angelina Jolie or Olivia Wilde.
- Heart: Wider forehead, prominent cheekbones, narrow/pointed chin. Often features a widow’s peak hairline. Examples: Reese Witherspoon, Scarlett Johansson.
- Long/Oblong: Face length is noticeably greater than width, straight sides. Cheeks, forehead, and jawline are similar in width. Sarah Jessica Parker is a classic example.
- Diamond: Narrow forehead and jawline, widest at the cheekbones. Usually angular features, with a pointed chin. Think Rihanna or Megan Fox.
- Inverted triangle: Wide forehead, strong cheekbones, sharply tapered chin. Similar to heart shape but with a more angular jaw and less pronounced widow’s peak. Think Victoria Beckham.
For a digital shortcut, AI-powered apps like Makeup Check AI scan your face and generate instant shape analysis, saving time and guesswork. These tools use facial recognition algorithms to map measurements and suggest the closest match, even accounting for subtle asymmetries that are common in real faces. This technology can be especially helpful if you’re unsure or fall between categories.
Section 2: Highlighting and Contouring—The Science of Light & Shadow
How Highlighting and Contouring Work Together
Highlighting and contouring are complementary. Highlighter brings forward features by reflecting light, while contour adds dimension and depth by creating shadows. When mapped to your face shape, this duo can visually modify facial proportions—elongating, narrowing, softening, or sharpening as needed.
Think about how light naturally falls on your face: the tops of cheekbones, bridge of the nose, and brow bones catch the most light, while hollows under the cheeks and along the jawline tend to recede. Highlighting these high points and contouring the shadows exaggerates or corrects natural structure. This technique has been used for centuries in portraiture and stage makeup, and now, with modern products and tools, anyone can achieve camera-ready results at home.
The Principles of Placement
- Highlight zones: Areas you want to bring forward or draw attention to (e.g., cheekbones, brow bone, nose bridge). For example, applying highlight to the center of the forehead and chin creates the illusion of a more pronounced and balanced profile.
- Contour zones: Areas you want to recede or slim (e.g., under cheekbones, jawline, sides of the nose). For a wider face, contouring the sides of the forehead or lower jaw can visually narrow the face.
Strategic placement tailored to your facial geometry creates the illusion of symmetry and balance. For example, for a round face, vertical center highlighting elongates; for a square face, softening the jawline with highlight and contour creates a more oval appearance. If your features are uneven—say, one cheekbone is higher than the other—adjusting highlight and contour can help create a more symmetrical appearance in photos and in person. For those with prominent foreheads or chins, contouring these areas while highlighting the center of the face creates harmony.
Practical Application
Use a lighter shade (one to two tones lighter than your foundation) for highlighting, and a deeper, cool-toned shade for contour. Blend seamlessly for a natural gradient—never harsh stripes. For example, if your foundation is a medium beige, choose a highlighter that’s a light, slightly luminous ivory and a contour that’s a deep taupe or ash brown. Avoid orange or red undertones in contour—they can make the shading look unnatural, especially in daylight.
Tools matter: use a small, tapered brush or a beauty sponge for precision. A dual-ended stick or palette with both contour and highlight shades makes application easier and ensures color harmony. Apply in thin layers and build up coverage as needed—this prevents caking or patchiness.
Curious about the future of personalized beauty routines? Read more about AI Makeup: The Future of Personalized Beauty Routines for deeper insights into tech-driven customization.
Section 3: Highlight Placement Zones and Product Selection
Where to Apply Highlighter
- Forehead center: Adds dimension; avoid if you have a broad or oily forehead. Place a small amount right above the brow arch if you want to draw the eye upward.
- Under-eye area: Brightens and counteracts shadows; crucial for a fresh look. Use a slightly matte formula here to prevent emphasizing fine lines.
- Cheekbones: The classic zone for lift and radiance. Start at the top of the cheekbone, just above the blush, and sweep upward toward the temple for a lifted effect.
- Nose bridge: Slims and elongates the nose; keep the line thin and precise. Avoid highlighting the tip if you have a bulbous nose—stick to the bridge for subtlety.
- Chin: Adds forward projection; skip if your chin is already prominent. A small dab right at the center can balance a receding chin.
- Brow bone: Lifts the eye area and defines brows. Apply just below the arch of your brow and blend outward.
- Cupid’s bow: Accentuates the upper lip and adds fullness. Use a fine brush for precision, and pair with lipstick for an amplified effect.
Remember: less is more. Over-applying highlighter can make skin look greasy or emphasize texture. Always start with a small amount and build up as needed.
Choosing the Right Highlighter: Intensity, Sheen, and Texture
- Intensity: For subtle day looks, opt for a soft sheen; for evening or editorial, try a stronger shimmer. Build gradually—one layer for daytime, two or more for dramatic impact.
- Sheen: Pearl and satin finishes suit most skin types, while chunky glitter can emphasize texture. If you have mature or textured skin, stick to micro-fine shimmer or even matte "brighteners."
- Texture: Creams and liquids melt into the skin and work well for dry or mature skin. Powders are best for oily or textured skin but require thorough blending. Sticks and balms are great for on-the-go touch-ups and layering.
Test in natural light and adjust product choice based on your skin’s needs and finish preferences. If you’re in doubt, swatch on your hand and check the reflection at different angles. Make sure the highlight doesn’t look patchy, chalky, or sit on top of the skin.
For example, if you’re going for a no-makeup look, pick a cream highlighter close to your skin tone with a dewy finish. If you love a bold, party-ready vibe, opt for a powder with high shimmer. Choosing the right base (liquid, cream, or powder) that matches your foundation type ensures longevity and prevents pilling.
Personalization Made Easy
Apps like Makeup Check AI streamline product and placement choices by analyzing your skin tone and face structure, recommending exact shades and finishes. For example, the app might suggest a pearly-pink highlighter for cool undertones, or a gold-champagne hue for warm, olive skin. It can also flag if you have dry, flaky patches (best for creams) or oily zones (better for powder formulas), making your selection process faster and more accurate.

Section 4: Highlighting Techniques for Every Face Shape
Round Face: Elongate and Add Angles
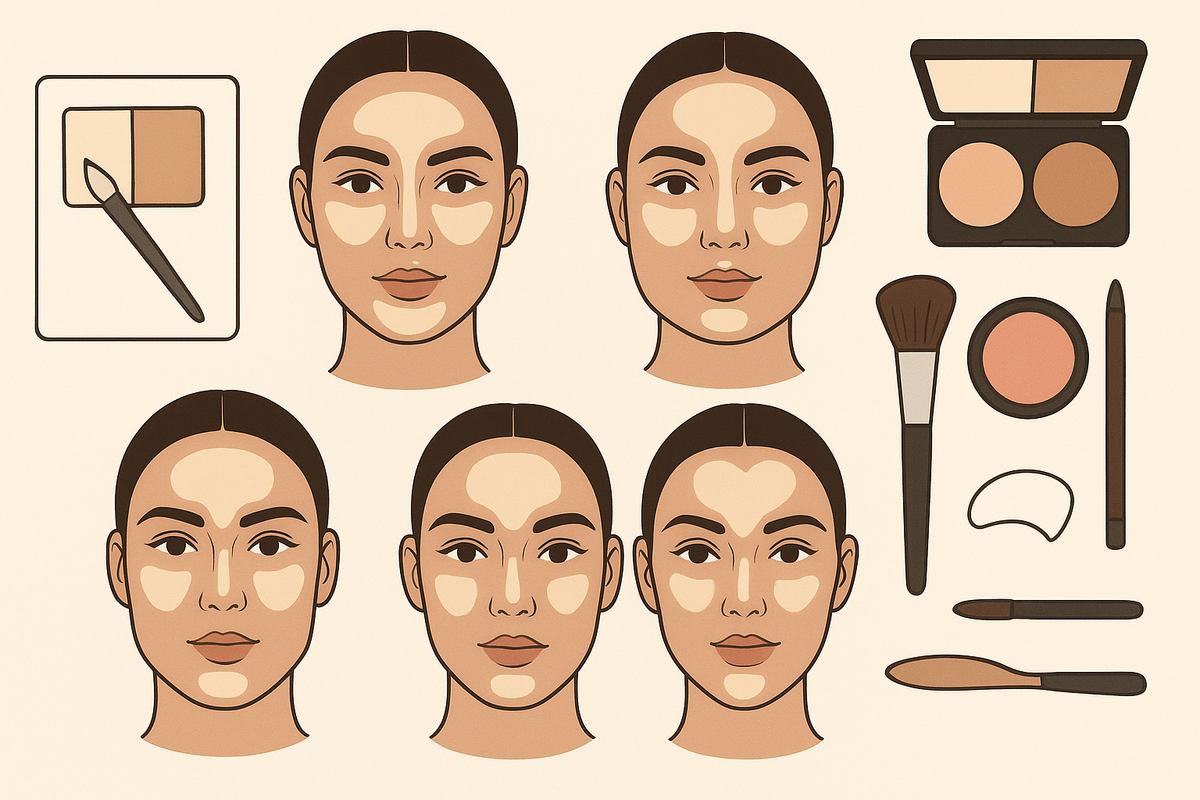
- Highlight: Draw a vertical line down the center of the forehead, nose, and chin. Apply under the eyes in a triangle shape and on top of cheekbones, keeping highlight close to the center to elongate.
- Avoid: Highlighting the sides of your face; this adds width.
Pair with contour below cheekbones and along the jawline to create soft angles. For a round face, the goal is vertical emphasis and avoiding horizontal width. When highlighting under the eyes, extend the triangle shape slightly downward to create the illusion of length. Keep blush and highlight higher on the cheekbones, not too close to the apples, and sweep upward toward the temples. For more on makeup for a round face, see our shape-specific tutorials in the app.
Oval Face: Enhance Natural Balance
- Highlight: Cheekbones, brow bones, nose bridge, and Cupid’s bow. Less is more—focus on what you want to pop, not reshape.
- Avoid: Over-highlighting the chin or forehead, which can throw off natural symmetry.
Oval faces are the most versatile for makeup. Use your highlight to celebrate natural proportions. For a soft, radiant effect, apply a thin layer of highlighter along the cheekbones and blend up toward the temples. A touch on the Cupid’s bow and brow bone gives a lifted look without altering your face’s natural harmony. Resist the urge to highlight the entire forehead or chin—too much can make the face look unbalanced or overly shiny in photos.
Square Face: Soften Angles and Jawline
- Highlight: Center of the forehead, under-eye area, top of cheekbones (swept slightly upward), and chin. Add a touch above the jawline’s corners to soften sharpness.
- Contour: Heavier under cheekbones and at jawline corners for definition and balance.
The goal for square faces is to soften strong lines and angles. Highlighting the center of the face draws the eye inward, while contouring the jaw corners and temples minimizes width. When applying highlight above the jaw, use a very light touch and blend well—this can help round out a boxy lower face. Avoid extending highlight too far out on the cheekbones; keep it lifted and focused. Pair with softly rounded brow shapes to visually balance the angular jaw.
Heart-Shaped Face: Balance Forehead and Chin
- Highlight: Under-eye area, cheekbones, and slightly at the center of the chin for fullness. Use a minimal touch on the forehead center to avoid widening.
- Contour: Temples and sides of the forehead to decrease width.
Work with your natural features rather than against them for a harmonious look. The heart-shaped face often benefits from highlighting under the eyes and at the chin to visually widen the lower portion and balance a broader forehead. Contour the sides of the forehead and temples lightly, blending well to avoid visible lines. If your chin is very prominent, keep highlight here minimal or use a matte brightener rather than shimmer.
Long/Oblong Face: Add Soft Fullness
- Highlight: Under the eyes (blending outwards), tops of cheekbones, and across the middle of the forehead. Avoid vertical lines down the nose and chin, which elongate.
- Contour: Hairline and under the chin to visually shorten the face.
With long or oblong faces, the aim is to create the illusion of width and reduce length. Blend highlight horizontally across the cheekbones and the center of the forehead—avoid creating vertical stripes, which can make the face look even longer. Contour along the hairline and under the chin to visually "bring up" the top and bottom of the face. Blush should also be applied horizontally, not swept up toward the temples.
Diamond and Inverted Triangle Faces: Widen the Forehead or Jaw
- Diamond: Highlight forehead center and chin for balance; contour cheekbones subtly.
- Inverted triangle: Highlight chin and jaw corners; keep forehead highlight minimal.
For diamond-shaped faces, the widest point is usually the cheekbones. To balance, apply highlight at the forehead’s center and the chin’s tip, then contour just below the cheekbones to soften the width. For inverted triangle shapes, focus highlighter on the chin and jaw corners to create the illusion of a wider jaw, while keeping the forehead matte or only lightly brightened. Avoid heavy highlight on the upper face, as this can exaggerate the tapered effect.
For more on how to contour by face shape, see our in-depth guides in the Makeup Check AI app. The app’s virtual try-on feature lets you preview different highlight and contour placements before applying, ensuring your technique fits your individual features.
Section 5: Blending, Finishes, and Avoiding Common Mistakes
Blending for a Seamless Finish
- Creams: Use a damp sponge or synthetic brush. Tap, don’t drag, to preserve coverage and avoid patchiness. Creams are ideal for layering and give a natural, skin-like finish. Warm the product on the back of your hand for smoother application.
- Liquids: Work quickly—liquids set faster. Blend edges into foundation for a diffused glow. Great for those who want a dewy, luminous effect. Use a stippling brush or damp beauty blender for best results.
- Powders: Apply with a fan or tapered brush. Build in light layers to prevent caking. Powders work well over set foundation and are less likely to disturb underlying makeup. Swirl off excess before applying for a soft-focus effect.
Always blend highlight and contour where they meet for a natural transition. Unblended lines can look harsh, especially in daylight or photos. Spend extra time diffusing the edges with a clean brush or sponge for a flawless finish. Using a setting spray after blending can melt the powders and creams together, further reducing harshness and increasing longevity.
Layering different formulas can also create dimension—try a cream or liquid highlighter as a base, set lightly with powder, and finish with a touch of shimmer only on the highest points for a 3D effect. This technique is especially effective for photography or special occasions.
How to Avoid Emphasizing Texture or Pores
- Choose fine-milled powders or liquid/cream formulas for textured skin. These products reflect light without settling into lines or pores.
- Avoid heavy shimmer or glitter over areas with enlarged pores or fine lines. Stick to luminous or satin finishes, which provide glow without sparkle.
- Prep skin with a smoothing primer; see best primers for makeup and foundation for tailored recommendations. Primers fill in pores and create an even canvas, making highlighter application smoother and more even.
Less is more—concentrate highlight only where you want to draw attention, and keep product away from problem areas. For example, if you have texture around your nose or cheeks, skip highlighter in those areas and focus instead on the brow bone or Cupid’s bow. Blot with a tissue if you accidentally over-apply, or blend with a clean brush to diffuse the shimmer.
Another tip: set your highlighted areas with a finely milled translucent powder before applying powder highlight. This minimizes settling into pores and increases staying power. For oily skin, blotting papers can keep shine under control without disturbing your highlight.
Common Highlighting Mistakes and How to Fix Them
- Highlighting too wide: Stick to the highest points of your face; avoid the entire under-eye area or forehead. If you’ve applied too much, use your foundation brush (with leftover product) to softly tone down the edges.
- Highlighting too far out: Keep cheekbone highlight above the apples, not extending to hairline. Overextending can drag the face down or make it appear wider than intended.
- Using the wrong shade: Too light can look ashy; too dark won’t give lift. Match undertone for a seamless blend. If in doubt, swatch under natural light and check for a "stripe" effect. The right highlighter should melt into your skin and only catch the light at certain angles.
If you want to analyze your makeup technique and get feedback, try the app’s step-by-step AI Makeup Tutorial: Your Guide to Smart Beauty Routines. The app can visually assess your highlight and contour placement, suggest corrections, and even simulate different finishes—saving you time and product.
Section 6: Blush & Brow Placement by Face Shape
Blush Placement by Face Shape
- Round: Apply blush slightly above the apples of the cheeks, sweeping upwards towards the temples to lift the face. This helps counter horizontal fullness and creates a more sculpted effect.
- Oval: Place blush on the apples and blend towards the ears for a natural flush. Oval faces suit almost any blush placement but benefit from keeping the color centered and softly diffused.
- Square: Keep blush soft and circular on the apples to soften angularity. Avoid harsh, straight lines that might accentuate the jaw.
- Heart: Apply below the apples and blend outward to balance a pointed chin. This draws attention away from the chin and toward the mid-face.
- Long/Oblong: Blend blush horizontally across the cheeks to add width. Keep blush low and avoid sweeping upward, which can elongate the face further. Cream blushes or soft powders work well for this shape.
Blush is the finishing touch that ties together highlight and contour. Using a cream blush under powder can create a "lit from within" glow that looks natural and lasts longer.
Brow Shape for Your Face
- Round: High, arched brows elongate the face. Avoid rounded brow shapes, which echo the face’s natural curves.
- Oval: Softly angled brows maintain balance. A gentle arch keeps the overall look harmonious.
- Square: Curved or softly rounded brows offset strong jawlines. Avoid flat brows, which can make the face appear boxier.
- Heart: Rounded brows soften a wider forehead. A low, gentle arch balances the sharpness of a pointed chin.
- Long/Oblong: Flat, straight brows reduce the appearance of length. Extending the tail slightly outward (not downward) creates the illusion of width.
Brows frame the face and can visually alter your face shape’s proportions, just like highlight and contour. Experiment with subtle changes for dramatic effect. For example, filling in sparse tails can lengthen the brow and balance a long face, while a higher arch can lift a rounder face shape. Brow gels and pencils allow for precise shaping, while powders create a softer, fuller look.
When shaping brows, start by mapping points: the front should align with the inner corner of the eye, the arch with the outer edge of the iris, and the tail should finish at a diagonal from the nostril to the outer corner of the eye. This classic mapping technique works for all face shapes and serves as a starting point for personalized adjustments.
Personalized Guidance with AI
AI-powered apps like Makeup Check AI offer virtual brow mapping and blush placement, letting you preview different styles and placements before you commit. The app uses facial recognition to suggest brow shapes that balance your unique features and recommends blush colors and placements tailored to your skin tone and face geometry. You can try on looks virtually and receive instant feedback, reducing trial and error and helping you discover your most flattering combinations.
Conclusion
Mastering highlighting techniques for face shape unlocks the power to enhance your natural beauty with precision. By determining your unique facial structure, tailoring highlight, contour, blush, and brow placement, and avoiding common mistakes, you create a harmonious, sculpted look that flatters every angle. Whether you are new to makeup or refining your artistry, adapting these techniques to your features ensures the most flattering results. For step-by-step tutorials, AI-generated face shape analysis, and personalized makeup plans, explore Makeup Check AI.
FAQ
Q: How do you highlight a round face shape?
A: For a round face, focus highlight down the center—forehead, nose, chin, and under the eyes in a triangle shape. Keep highlight close to the center of the face to elongate and avoid adding width. Pair with contour under cheekbones and along the jawline to add subtle angles. Remember to blend well, and keep blush and highlight high on the cheeks for a lifted effect.
Q: Where should you apply highlighter for an oval face?
A: Apply highlighter to the tops of the cheekbones, brow bones, the bridge of the nose, and Cupid’s bow. Oval faces benefit from subtle highlight that enhances natural symmetry rather than reshapes. Avoid applying too much to the forehead or chin to maintain balance.
Q: What is the best highlighting placement for a square face?
A: Highlight the center of the forehead, under-eye area, top of cheekbones, and chin. Add a touch above jaw corners to soften the jawline. Keep the highlight soft and blend well to avoid accentuating angles. Pair with contour at the jaw corners and temples to further round out the face shape.
Q: Should you highlight before or after contouring?
A: You can highlight before or after contouring, but many prefer to contour first, then highlight, so the lightest points remain crisp and not muddied by darker products. Always blend the edges where highlight and contour meet. Layering and blending are key for a seamless, natural effect.
Q: How do you choose the right highlighter shade and finish for your skin tone?
A: Match the undertone of your highlighter to your skin—champagne, gold, or peach for warm tones; pearl or icy tones for cool. For deeper skin, richer golds or copper work best. Choose cream or liquid for dry skin, powder for oily or textured skin, and avoid glitter if you have visible pores. Always swatch in natural light for the truest color match.
Q: How do you keep highlighter from emphasizing pores or texture?
A: Prep with a smoothing primer, choose fine-milled powders or liquid formulas, and avoid placing highlight directly over textured areas. Use a light touch and build gradually for a natural, radiant effect. If you notice your highlight catching on texture, gently blot and blend with a clean sponge or brush.