Asymmetric Face Makeup Tips: Balance and Enhance Uneven Features
Discover expert makeup tips for asymmetric faces to balance features using contouring and highlighting. Enhance your beauty with our step-by-step guide.
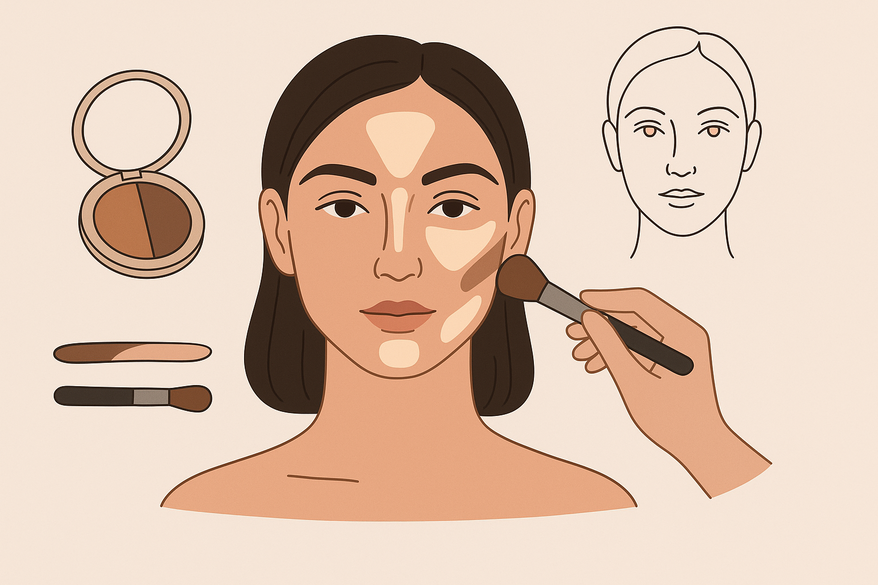
Estimated reading time: 9 min read
Key Takeaways
- Use contouring and highlighting to visually balance fuller and flatter sides of your face.
- Adjust eyebrow shape and eyeshadow techniques to even out asymmetrical features.
- Correct lip lines and blush placement for a harmonious look.
- Apply foundation and concealer strategically to unify skin tone.
- Select the right tools and products and personalize your routine based on face shape.
Table of Contents
- Introduction
- Understanding Facial Asymmetry
- Key Asymmetric Face Makeup Tips
- Step-by-Step Application for Common Asymmetric Areas
- Customizing Techniques Based on Face Shape
- Product Recommendations and Tools
- Expert Advice and Real-Life Examples
- Common Mistakes to Avoid
- Conclusion
Introduction
Discover how to use targeted cosmetics to balance uneven features and boost confidence. Natural asymmetry is common, and if left unaddressed, certain features can draw unwanted attention. By playing with light and shadow—and leveraging tools like Makeup Check AI—you can craft a more harmonious, camera-ready look.
In this guide, we’ll explore contouring, highlighting, brow tweaks, eyeshadow strategies, lip and blush corrections, and more. Whether you’re a beginner or a seasoned artist, you’ll find step-by-step techniques to enhance symmetry and let your natural beauty shine.
Understanding Facial Asymmetry
Facial asymmetry refers to subtle or pronounced differences in placement, size, or shape of your eyes, brows, cheeks, lips, or jawline. It’s a universal trait—almost no one has perfectly mirrored features. By identifying your unique imbalances, you can use makeup to sculpt light and shadow, guiding the eye toward a more balanced profile.
- Prevalence: One brow may sit higher than the other; a cheekbone might protrude more.
- Visual impact: Minor asymmetries often go unnoticed, but pronounced ones can disrupt facial harmony.
- Makeup solution: Highlight the flatter side to bring it forward and contour the fuller side to recede it.
Key Asymmetric Face Makeup Tips
A. Contouring and Highlighting
Contouring uses a shade one to two tones darker than your skin to push back the fuller side. Highlighting applies a lighter shade to the smaller side, bringing it forward.
Step-by-step contouring:
- Stand in natural light and pinpoint the fuller side by locating the roundest cheek or widest jaw.
- Draw a soft, diagonal line along the fuller cheekbone or jawline with an angled brush.
- Blend upward toward the hairline for a seamless transition.
Step-by-step highlighting:
- Dab a cream or powder highlighter on the high points of the smaller or flatter side.
- Blend outward with a damp sponge for a luminous finish.
Pro tips:
- Choose a neutral undertone contour to mimic natural shadows.
- Opt for a soft, luminous highlighter—avoid chunky glitter.
- Build in layers and check symmetry from multiple angles in the mirror.
For a deeper dive, explore our face contouring tutorial and the contour-highlight step-by-step guide.
B. Adjusting Eyebrow Shapes
Uneven brows can unbalance your entire look. Balanced eyebrows frame your eyes and anchor facial symmetry.
- Fill sparse areas on the lighter brow with a matching pencil or pomade.
- Gently extend the arch of the lower brow to match its counterpart.
- Blend strokes with a spoolie for a natural finish.
Tips:
- Use light, feathery strokes and build pigment gradually.
- Check your work in daylight to avoid over-darkening.
- Reference your nose and inner eye corner to keep brows parallel.
C. Eyeshadow and Eyeliner
Unequal lid space can make one eye appear larger or more hooded. Strategic shadow and liner application can equalize your gaze.
- On the smaller eye, place crease shadow slightly higher to match lid height.
- Use matte shadow on droopier lids to add depth without shimmer.
- Guide your winged liner with a card or tape at the same angle on both eyes.
- Build liner thickness from inner corner to wing using a small angled brush.
- Tightline the upper waterline for subtle fullness.
- Blend eyeshadow in thin layers to avoid harsh lines.
- Keep liner close to the lash line on hooded eyes.
- Buff edges with a clean brush for a soft effect.
D. Lips and Blush
Hello symmetry! Correct uneven lips and cheek placement for a harmonious smile.
- Overline the smaller side by tracing just outside your natural curve.
- Match the larger side’s curve by angling your liner upward.
- Fill with lipstick, blending toward the center.
- Apply blush slightly higher on a lower cheek to lift appearance.
- Blend in circular motions; match intensity but vary placement.
Tip: Cream blushes blend seamlessly under natural light.
E. Foundation and Concealer
An even canvas supports all other symmetry tricks. Layer thinly to avoid a cakey finish.
- Apply foundation with a damp sponge, blending outward to the hairline and jaw.
- Use a concealer one shade lighter under the darker or more shadowed eye.
- Set with translucent powder to prevent creasing.
- Neutralize dark circles first with peach/orange correctors—see our uneven skin tone makeup tips.
Step-by-Step Application for Common Asymmetric Areas
A. Jawline
Define and balance your jawline in three simple steps.
- Identify the wider side by looking straight ahead.
- Contour along the fuller jaw endpoint with matte bronzer.
- Blend downward to avoid visible lines.
- Use a medium-density brush for precise placement.
- Buff edges gently in short strokes.
B. Cheeks
- Contour the fuller cheek in the hollow beneath the bone.
- Highlight the smaller cheek’s high point to bring it forward.
- Blend both sides evenly for a subtle transition.
Tip: Check balance under different lighting—daylight vs. indoor.
C. Eyes
- Deepen the crease on the droopier eye with medium-dark shadow, blending upward.
- Match eyeliner thickness using a small angled brush for precision.
- Softly blend edges to avoid a “drawn-on” look.
- Curl lashes and apply mascara in wiggle motions for even volume.
Customizing Techniques Based on Face Shape
One size doesn’t fit all: your asymmetry’s location dictates your strategy.
- Tilted chin: Contour both sides, focusing on the protruding side to center it.
- High cheekbone: Highlight the opposite side to match height.
- Broad forehead: Apply bronzer along the hairline on the wider side.
Strategy:
- Map your bone structure by tracing with clean fingers in front of a mirror.
- Use a light makeup pencil to mark areas before applying product.
- Adjust product intensity based on the severity of each imbalance.
Product Recommendations and Tools
Brushes
- Angled contour brush: sculpt jawline and cheek hollows.
- Small shader brush: detailed eyeshadow and brow work.
Sponges
- Teardrop beauty sponge: flawless foundation, highlight, and concealer blending.
Key Products
- Cream contour sticks like Fenty Beauty Match Stix for buildable sculpting.
- Sheer cream blushes for gradual, natural color.
- Waterproof brow pens for precise arches.
- Matte bronzers to contour without shimmer.
- Clean brushes weekly; replace sponges every 1–2 months.
- Choose multi-use tools to streamline your kit.
Expert Advice and Real-Life Examples
Pro Tip: Always work in natural light and use a handheld mirror at angles to spot uneven areas.
Case Study: Jawline Balance
- Subject: Right jawline wider.
- Technique: Contour right side deeper; highlight left chin.
- Result: A centered, balanced jaw appearance.
Case Study: Brow Lift
- Subject: Left brow sits higher.
- Technique: Fill right brow arch; lift with clear brow gel.
- Result: Even arches that frame both eyes symmetrically.
Bonus tip: Photograph each step under consistent lighting to compare before-and-after results.
Common Mistakes to Avoid
- Over-contouring with harsh lines—always blend with a clean tool.
- Applying identical product amounts on both sides without assessing each side’s needs.
- Ignoring hairstyle—hair parting can accentuate or hide asymmetry.
- Using frost finishes in contour areas, which spotlight texture.
Quick fixes:
- Build product gradually in light layers.
- Use stippling brushes for soft shadow blending.
- Adjust intensity per side based on bone structure.
- Consider a side part to camouflage stubborn imbalances.
Conclusion
Recap:
- Contour and highlight to sculpt and balance facial differences.
- Shape brows and apply eyeshadow to even out the gaze.
- Correct lips and blush placement for a lifted look.
- Use foundation and concealer strategically for a uniform canvas.
- Leverage the right tools and products for seamless application.
With these asymmetric face makeup tips, you’re equipped to highlight your best features, correct imbalances, and boost confidence. Experiment in natural light, map your unique asymmetries, and practice until you find your perfect balance.
FAQ
How do I identify my facial asymmetry?
Stand in natural light and note which side appears fuller or flatter in key areas—eyes, cheeks, jawline. You can also photograph your face straight-on and compare both halves.
Can beginners master these techniques?
Absolutely! Start with light product application, build gradually, and use clear tools like sponges and brushes to blend. Reference tutorials and use tools like Makeup Check AI for personalized guidance.
What if I have multiple uneven areas?
Address one area at a time—jawline, cheeks, brows—using the appropriate contour, highlight, or color correction strategy. Once each section feels balanced, step back and assess the overall harmony.
How often should I clean my tools?
Clean brushes weekly to prevent bacteria buildup and replace sponges every 1–2 months for optimal hygiene and performance.
Will these techniques work for all skin tones?
Yes, by choosing products with the right undertones—neutral contour shades and complementary blush hues—you can adapt these tips for fair, medium, and deeper complexions.

